Weaving - Part 1
My high school graduating class had its 50th reunion this past summer. I did not attend but I did enjoy looking through the pictures that were posted on our class FaceBook page. Included among the pictures was one of Barb Burghardt who was a close friend of mine during those horrible high school years so long ago. Barb and I totally lost touch when we went off to college and we hadn't been in contact for the last 50 years. I emailed her to find out how she enjoyed the reunion and we have been trading notes ever since. In those emails I have talked about weaving, since it's one of the things I love most about my current life. Barb pointed out that she had absolutely no idea what I was talking about. Weaving can be pretty confusing to someone who doesn't do it. And, from time to time, it can be confusing to those of us who do it, too. I decided if Barb was confused there were probably other people out there who were confused too. So I'm going to explain weaving very simply in three parts. Part 1 is the planning and prep stage, Part 2 is the actual weaving and Part 3 is the finishing. So here goes....

Weaving, no matter what kind of loom you use, is simply interlacing threads in a couple of different directions. The threads, or yarns, or grass fronds or strips of plastic bags, or whatever you are weaving are crossed over and under each other to make a fabric that you can use for clothing, or bedding or bundling. The materials you use and how you set up your loom will determine if the fabric is soft and supple or hard and rough. The first part of the project is to plan what you want to weave and what materials you want to use.

For this discussion I'll talk about my most recent weaving project - linen face cloths. I wanted to weave a fabric that would be soft and flexible enough to use as a wash cloth but will also be slightly rough enough to be exfoliating. It's a fine line between too rough to use on your face and so soft that you don't get a nice scrub.

The next question is how much fabric do I want to create? While different looms can weave different shapes of fabric, my looms, along with many others, weave a strip of cloth. This strip of cloth can be up to the width of the loom and as pretty much as long as you want it, with some limitations. The yarn that is wound onto the loom is called the warp and it's usually measured in yards. My happy place is 12 to 15 yards per warp. Of all the parts of the weaving process, I'm not very interested in warping the loom so putting on a long warp gives me more weaving pleasure before I have to go through the process again. For my face cloths I picked 15 yards as the length which should give me about 30 face cloths when I'm finished.

What weave structure or pattern do I want to use? I love a waffle weave for face cloths. The weave structure gives a great texture and the pattern allows me to use whatever colors I want and still look stunning. Having picked the pattern helps me decide how close together I want those warp threads to be. If I really pack them in tightly I'll get a fabric that is very stiff. If I separate them far apart I'll get a diaphanous fabric which might be wonderful as a scarf but won't last as a face cloth. For this project I picked 20 ends per inch. I want my face cloths to be about 15" wide so I need the fabric on the loom to be a bit wider - 16". Doing the math, that means I need 20 ends per inch times 16 inches or 320 warp threads each being 15 yards long. I'll add a couple of extra threads to the warp to stabilize the outside edges or selvages. I'm using linen for this project because I love linen and because it makes wonderful face cloths. I'll use different colors and textures of linen yarn so I'll have stripes and texture.

There are a couple of ways to get your warp yarn onto the loom. I won't go into all of that except to say that my looms have pegs on the warp beam that allow me to add a 2" section of warp at a time. Other looms require a different approach.

Now I have the warp on the loom. It's all wrapped around the back warp beam and it needs to be threaded through the heddles and the reed. The heddles help create the weave structure or pattern and the reed holds the warp threads together at the correct closeness.
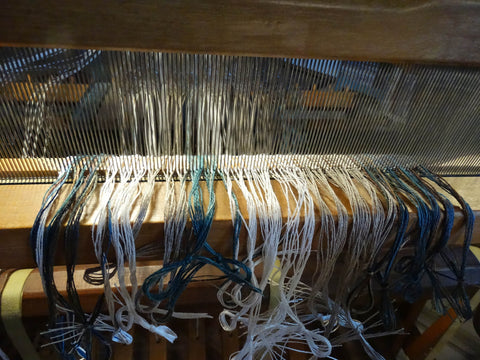
Once all that threading has been done, I tie the warp threads onto the front beam so that they all have a similar tension. The only thing left before I get to start weaving is tying up the treadles. The treadles help the heddles create the weave structure. This is the part of the process I dread because it requires crawling around on the floor. Or getting a loom that is computer controlled... oh, wait. I just bought one of those.

Now I'm ready to weave. I'll talk about that part of the process in the next blog.